topamax once a day

Arduino USB HID Keyboard
Turn your Arduino UNO into a USB HID keyboard, and make buttons that do whatever you want. Make it a useful tool, with new buttons for Cut/Copy/Paste or Volume+/Volume-/Mute, or annoy your friends and colleagues by setting the keyboard to perform random keypress after random delays!

The USB HID keyboard conforms to the standard USB specification, so is functional on all modern operating systems.  All this is made possible by the use of the Arduino Device Firmware Update (DFU) function.

Arduino Device Firmware Update (DFU)

The Atmega8U2 chip on the Arduino UNO can be programmed directly using the special USB protocol called Device Firmware Update (DFU). This is completely independant of the ‘normal’ method of flashing sketches to the board using the Arduino IDE.

This process is normally used to update the firmware to a more recent version, as explained in the offical Arduino guide, Updating the Atmega8U2 on an Uno or Mega2560 using DFU. Note: If your board is NOT an Arduino UNO SMD you’ll need to solder a 10k resistor (Brown-black-orange) at the back of your board as shown on the Arduino site.

However, in addition to the ability to flash standard USB Serial firmwares, we can also flash alternative firmwares as well. This allows the device to be recognized as many other device types, including keyboard, mouse, joystick, midi device, etc. This is made possible in part to the wonderful open source LUFA (Lightweight USB Framework for AVRs)  USB stack, and keyboard HID firmware from Darran.

In this demonstration, we will flash generic USB HID keyboard firmware. The USB HID protocol provides manufactures the generic specifications to interact with nearly every operating system in existence. For more info, check out the USB HID Spec sheet.

Before you start, install the required packages. On Ubuntu and Debain systems, in a terminal run:

sudo apt-get install dfu-programmer dfu-util

For Windows and Mac instructions to install the dfu-programmer tool, consult the official Arduino DFU documentation.

Then download these two firmware files:

Arduino-usbserial.hex
Arduino-keyboard-0.3.hex

The first step is to make sure you are able to flash the standard arduino firmware. This will confirm that the programmer and the environment are both functional. NOTE: There is no chance of ‘bricking’ the device using this method. The Arduino bootloader firmware can always be updated using the DFU protocol!

sudo dfu-programmer at90usb82 erase
sudo dfu-programmer at90usb82 flash --debug 1 Arduino-usbserial.hex
sudo dfu-programmer at90usb82 reset

Plug cycle the Arduino, then open the Arduino IDE and ensure that you can still upload a sketch. Assuming everything flashes normally, we can move forward with flashing the HID keyboard firmware.

sudo dfu-programmer at90usb82 erase
sudo dfu-programmer at90usb82 flash --debug 1 Arduino-keyboard-0.3.hex
sudo dfu-programmer at90usb82 reset

NOTE: The Arduino can only be flashed with skectches through the Adruino IDE if the Arduino-usbserial.hex bootloader is active. So, to develop a USB HID device, the process becomes:

Flash Arduino-usbserial.hex bootloader with dfu-programmer (erase/flash/reset)
Plug cycle the Arduino
Flash firmware sketch using Arduino IDE
Plug cycle the Arduino
Flash Arduino-keyboard-0.3.hex bootloader with dfu-programmer (erase/flash/reset)
Test and repeat

Now that you understand how the process works, you can try out some of these keyboard samples. The easiest example is the random keypress with random delays, since it doesn’t require any components connected to the Arduino.

Random Key/Random Delay

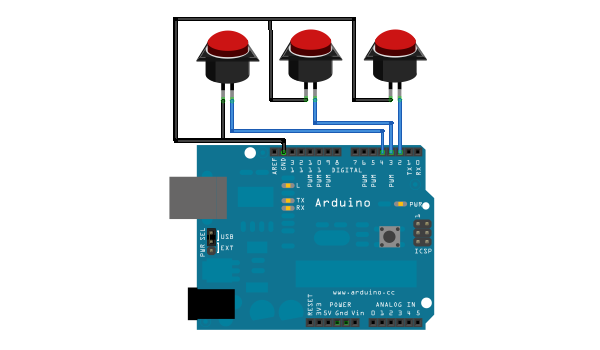
The following two examples both use three buttons connected to the Arduino. The code can easily be changed to make the buttons perform other actions, by consulting the mapping tables in the USB HID documentation.  Here is a diagram of the circuit, (created with Fritzing):
 

Volume+/Volume-/Mute

Cut/Copy/Paste


  • Pingback: Arduino USB HID Keyboard | Arduino Passion()

  • Pingback: Using an Arduino board as a USB keyboard « freetronicsblog()

  • Pingback: MAKE | USB Keyboard Support with the Arduino Uno()

  • Pingback: hello world » Blog Archive » Arduino를 키보드로 사용()

  • Pingback: USB Keyboard Support with the Arduino Uno / Cooking Hacks Blog()

  • Pingback: USB Keyboard Support with the Arduino Uno()

  • kirill

    Neat, I found it easier to flash the 8U2 via an external programmer, but I like that it is possible to do it using a DFU

    • Hi kirill,
      Good to know that this method is functional as well!

    • Eh, can i flash those files from external board? SPI?

    • zeeshan

      can i rewrite firmware to recognize device as hid device with with my name ?

  • Zirrus

    I wonder, could the teensyduino add-on be used to upload sketches while the 8U2 is burned with the keyboard hex?

    • Interesting… I was previously not familiar with the teensyduino add-on. I will give it a try and see if this will work to flash sketches while the keyboard hex firmware is active.

      • Zirrus

        Looks like teensy uses a special proprietary bootloader call HalfKay, instead of DFU. LUFA has a similar HID bootloader that can be used as an alternative, from what I’ve found (http://elasticsheep.com/2010/01/installing-the-lufa-teensyhid-bootloader/).

        The hardware/teensy/boards.txt file for the teensyduino addon will need to be edited, and there is no support for a90usb82 in the headers. Could be an involved project to add the capability.

        • Aww… too bad. This seemed like it would be a more efficient solution to the current awkward development cycle of flashing back and forth to the serial firmware.

          • Zirrus

            Yea, I’m still looking at it. If anything, it would be nice to be able to flash back and forth to the serial firmware from inside the arduino ide.

  • Bekky

    Really awesome stuff. The sudo “dfu-programmer at90usb82 erase” fails me though, all I get is “dfu-programmer: no device present.”. I can see the my UNO with lsusb … Anyone got any ideas?

    • Zirrus

      If you can see your UNO and *Not* UNO DFU, your ATmega8U2 isnt in DFU mode. Different revisions have different methods to reset into DFU, my UNO R2 only requires a momentary short on pins 5 & 6 of the 8u2’s ISP header.

    • Zirrus is right. You will only be able to see the UNO in DFU if you have performed the momentary short of the ISP header pins. If you are able to see it from the Adruino IDE (or it is currently running the keyboard firmware and is acting according), then give the momentary short another attempt.

      • Bekky

        Thanks you two. It is all still a bit strange to me though.

        When I short the two ISP pins (reset & gnd) the small LED marked “L” flashes a few times and I can no longer see the UNO from the Arduino IDE.

        With lsusb, this is what I get: “Bus 004 Device 010: ID 03eb:2fef Atmel Corp.” – where before the UNO was listed by lsusb without the “Atmel Corp.”-part.

        However, I still get the “no device present.” when I try to run the “dfu-programmer at90usb82 erase”-command. Both as root and regular user.

        Oh dear 🙁

        • Zirrus

          Hello again Bekky. You’re on the right track atleast. You might need to add a rule to udev to have permissions to the device. You can trying running ‘sudo dfu-programmer’ and see if that works OR you can create the file /etc/udev/rules.d/99-dfu-programmer.rules and add the following text:

          SUBSYSTEM==”usb”, ACTION==”add”, SYSFS{idVendor}==”03eb”, SYSFS{idProduct}==”2fef”, MODE=”660″, GROUP=”plugdev”, SYMLINK+=”at90usb-%k”

          BUS==”usb”, ACTION==”add”, SYSFS{idVendor}==”03eb”, SYSFS{idProduct}==”2fef”, MODE=”660″, GROUP=”plugdev”

          Then restart udev with “/etc/init.d/udev restart” This should change the permission so that your user account can touch the device.

          • Henry

            I have been using an Uno compatible device called an eleven from Freetronics. I initially had similar issues to you with setting the at90usb82 to DFU mode – The method I found that works best, is too short the two pins(reset and gnd), push the reset button, remove the short (whilst still pressing the button), then release the button – I found that I then got three short flashes from the LED, and was able to send erase using dfu-programmer. Hopefully this may help?

  • Pingback: Arduino Uno as USB HID keyboard – Part 1 | Doodling With Electrons()

  • Pingback: Arduino USB HID Keyboard -- Arduino Passion()

  • Henry

    Nice Tutorial – thanks for sharing – It really got my project moving in the right direction. The links are a wealth of information also. Cheers

  • Hi Michael,

    I have loaded the arduino-keyboard hex file on my r3 uno, with a 16u2, and i am able to send any character (a through z) but i cant get the volume up (128) mute (127) or volume down (129) or it seems any thing above 100 to work. page up and down (75 and 78 are working)

    my code is :

    buf[2] = 127; // Random character
    Serial.write(buf, 8); // Send keypress
    releaseKey();

    any ideas why it wont work? i have spent many hours trying to figure it out, I am using the latest keyboard hex (0.3).

    Cheers

    • Almost 3 years later…xD

      0x80 for volume up
      0x81 for volume down
      0x7F for mute

  • Pingback: L’heure du barbu – podcast Audio – le pilote… « La Grotte Du Barbu()

  • Jörg

    Hi Michael,

    the keybord software works fine, but when when i put the uno board into a usb-hub bios and windows only see an unknown device. It is so too when i use a power supply.
    Any idea?
    I have tested this with some hubs

  • rgm

    Can you link us to the source code of Arduino-keyboard-0.3.hex please?

  • Would I be able to use the USB keyboard functionality on another chip, like an ATtiny45? Would I first reflash the Arduino, then use it in that mode to program the ATtiny45? would I need something larger, like an ATmega? or does the Arduino have magic that I just can’t get from one of these chips alone?

    http://blog.makezine.com/2011/10/10/how-to-shrinkify-your-arduino-projects/

    This is a great project idea but, like all of them, I hate the thought of giving up my Arduino permanently 🙂

  • Ulrich Prinz

    Hi Michael,

    This little ‘toy’ of yours has become an important productive tool for me!
    Thank you for documenting this so nicely!

    I had bougth a Logitech Touchpad T650, and like many people that commented
    on the Logitech website, I find that it lacks gestures e.g. for Switch-to-next-Tab, Close-Tab, Close-window etc.
    These missing functions are now provided by a row of leftover Cherry MX keyboard keys at the top end of the T650 served buy the Arduino.
    Now I can whizz through tabs like a whirlwind 😉

    I have 2 more tips to make the whole thing even more efficient:
    1) Your code for the 3 keys still looks ok, but when you have more keys, it makes more sense to take out these 2 lines out of the individual “if” branches to the bottom of the loop
    Serial.write(buf, 8); // Send keypress
    releaseKey();
    2) Because I have to drag the little Arduino out of its tiny Keyboard-Case every time I want to DFU and reprogram it, I have changed the code to send the keycodes for F13 to F24 on the pins, and then using AutoHotKey (look it up in Google) to translate those into the keys&combinations that I really want. This allows also to use the few keys I have there very specific to the application that is active at the moment.

    • Wesley

      Are the F keys working for you? like one of the other users I can’t seem to get anything above 100 to work. I think it may be a PC thing, if you look at the key table there isn’t a PC-AT tick next to everything above 100.

  • RoSi

    Hi, say I want to send keypress like [CTRL] + [ALT] + [C] to computer via Arduino. What is the way to do it please?

    • buf[0] is for the modifier keys such as control, shift and alt. You can simulate multiple modifier keys simultaneously pressed by making buf[0]=KEY_LEFT_CTRL+KEY_LEFT_ALT;
      Then buf[2]=KEY_C;

      • Can you clarify for me if the “delete” key is considered a modifier key or just another key? If the latter, would you implement the “three-finder-salute” Control-Alt-Delete like this???

        #define KEY_LEFT_CTRL 0x01
        #define KEY_LEFT_ALT 0x04

        uint8_t buf[8] = {
        0 }; /* Keyboard report buffer */

        int PIN_POWEROFF = 7;
        int KEY_DELETE = 76;

        void loop()
        }
        state = digitalRead(PIN_POWEROFF);
        if (state != 1) {
        buf[0] = KEY_LEFT_CTRL+KEY_LEFT_ALT
        buf[2] = KEY_DELETE;
        Serial.write(buf, 8);
        releaseKey();
        }
        }

  • When my arduino 2560 is in HID USB keyboard mode, I have to press the reset button before it runs my code. Any idea what is going on here? is it a safe guard of some sort? Will I need to make a reset on boot circuit to get around this or is there another way. Also, is this just me or is it normal behavior?

    Other than this niggle it works great and your tutorial made it much easier to set up.

  • Pingback: Creating a Pinball Game Controller | Fun with DC Circuits (and phones, and robots …)()

  • ben

    Thanks for the informative post.
    I have a quick question, How do you send a long key press?
    for an example, long press home button on Android will activate google voice search app?

  • mike

    Hi, I am having trouble installing the DFU programmer, I get libusb0.dll missing when I try to run the program . Anyone have this same problem?

  • Mads Juel

    Hello, Im making a product with bitvoicer and and the key setup. I kan se that you buf 2 and then there is a number for the different letters .. i was wondering what the numbers for [a],[s],[d],[w] and/or the arrow keys 🙂 ??

  • Pingback: Arduino | MuuTTa()

  • Pingback: Arduino and servos | santerifriman()

  • Pingback: Transponder XPNDR()

  • This is really cool, I would like to use this for a custom keyboard project. But with this new firmware on the Arduino. Since it is using the __factory USB__ port to communicate with PC **as a keyboard**, doesn’t this increase the parts cost? What if you wantted to put this into a product? The cost would go up because instead of a $6 ATmel chip, you now have the cost of $22 arduino development board to? That is was it seems like to me.

    • Riley

      If you’re competent to buy a $6 smd chip (more like $2 really) and make PCB’s for production you don’t need Arduino in the first place. This project let’s folks use their existing Uno hardware in new ways, very groovy

  • rockstar

    Hey.. in the example code..
    buf[0]=27; //letter X
    I can’t understand from where does the no. 27 comes from?
    Plz help..

  • gast

    If you get problems with the r3, always try to replug the usb cable and restart the flip software

  • Hi, I am wondering, any chance to get this to work for Arduino Pro Mini?

  • when come arduino joystick hid interface code, ?
    need all 64 button(toggleswitch) and encoder inbut all maximum what can adding.
    and all analog inbut second board.
    or all button max what can adding one arduino board, second board have all encoder/rotary what can adding and thirth board have all analog(potentiometers)what can adding board.
    neew my game special joystick
    who make.???? i no can make im newbie but need thats fast.

  • nice post, saved a project of mine. thanks!

  • Pingback: Nate Beck | Arduino HID Keyboard and the World of Warcraft auto jumper.()

  • Curtdissel

    Does anyone know what keyboard table is used?
    http://www.usb.org/developers/devclass_docs/Hut1_11.pdf
    i tried using the table from pages 54-56 but the keys do not match up
    I would write a 4 to the buffer and get spaces when I expected an A.

    • Curtdissel

      I solved it. What had happened was was that I thought the same characters that appeared in the com screen would also be the output as a keyboard. I now know that to be false.

  • Curtdissel

    If I desire to press three keys at once like alt-control-delete.
    what is the best way to handle that?

    • marc

      Serial.write(228); //send control
      Serial.write(230); //send ALT
      Serial.write(99); //send DELETE
      works fine for me

  • Jordan Rejaud

    Hullo, I had some trouble getting your instructions to work with the Arduino r3 so I wrote this little guide:

    How to set an Arduino R3 into DFU Mode and then into a USB keyboard

    If using Arduino R3 then you don’t need an SMD Edition, that is just for the older versions!

    XX Have your computer recognize an Arduino as a USB keyboard XX

    First you upload your code to your Arduino using the regular Arduino IDE, nothing fancy.

    Get the Arduino into DFU Mode (See instructions below)

    Erase, flash, reset and “start” the KeyBoard Hex

    Plug cycle Arduino (This means uplug it, wait a few seconds, then plug it back in again)

    Tada! If you did it correctly then your computer should recognize the Arduino as a keyboard and not an Arduino!

    XX Changing the code on your Arduino once you’ve “turned it” into a keyboard XX

    If you want to change the code running on your Arduino (the chip inside it, technically) then keep reading.

    Plug Arduino into PC

    DFU Mode, Erase, flash, reset and “start” the Arduino Hex

    Plug cycle Arduino

    Computer should recognize Arduino as an Arduino and you can use the IDE to upload your code

    Plug cycle Arduino

    DFU Mode, Erase, flash, reset and “start” the KeyBoard Hex

    Tada! If you did it correctly then your computer should recognize the Arduino as a keyboard and it should now run the new code that you uploaded to it.

    XX Get into DFU Mode and have FLIP talk to the arduino XX

    Download and install FLIP

    Download the Arduino hex files (this file will have your computer recognize the Arduino as an Arduino when you plug it in) and the usb keyboard hex (this file will have your computer recognize the Arduino as Human Interface Device Keyboard when you plug it in)

    Plug in the Arduino to your PC

    Short the top 2 pins (the ones closest to the reset button) for 1 second, the device manager should no longer be able to recognize the Arduino that you just plugged into it and an unknown device will appear

    Open FLIP, set the device to ATMega16U2 and you should be able to connect to Arduino.

    I hope this helps somebody, cheers 🙂

  • Kyle

    I have a school project to make something with the arduino, I went the route of choosing to do keyboard commands to send strings into a game while I’m playing. I have flashed the firmware and loaded the keyboard.hex and tried a couple of the above examples, I have an arduino R1 I have soudered the 10k resistor onto the back for the firmware update. But anytime I upload one of the codes, put the arduino in DFU and upload the keyboard.hex, (I’m only testing everything with one button hooked up.) For the cut, copy, and paste one the cut command stays on the entirer time cutting anything I highlight or closing certain programs (like flip for instance), I used this method and unplugged the arduino and pasted from my keyboard, the text that it cut is there so the cut is functioning but won’t shut off when I’m not pressing the button. Any help would be greatly appreciated the project is due in a couple days and I’m no where close to getting this working, let alone being able to enter a string push a button on arduino and have it paste the string from the code to my game,
    (Short version: The buttons are always read as on constantly cutting text? Don’t know if I’m doing something wrong, it’s my version of the arduino (R1) or the code here is written to be always used. I highly doubt that last one is the case but thought I would add it.)
    Do you need 3 buttons hooked up and I’m just wreaking it by only using one?

  • Hi there, recently the Arduino Leonardo came out and I wanted to ask if you have tried to flash the Leonardo-Bootloader to the 16u2 of the Uno R3 and if yes if it is then possible to load sketches onto the 16u2?

  • Pingback: Arduino Uno as a USB HID Interface – Signals()

  • Pingback: Arduino Uno as a USB HID Interface – goto;()

  • I get the random keyboard to work, but i am not able to get the pushbutton to send a spessiffic char on buttonpress..

    Anyone having trouble with this?

  • Fafhrd

    Great tutorial :

    My only headache was I wanted to understand the contents of HID output buffer [0] and I couldn’t find any documented definitions. It must be spec’d somewhere but for others… my current understanding is that the high / low nibble reflect the right/left side of the keyboard respectively and that the following are true

    #define KEY_LEFT_ALT 0×04
    #define KEY_RIGHT_ALT 0×40

    #define KEY_LEFT_GUI 0x08
    #define KEY_RIGHT_GUI 0x80
    (GUI == Windows Key on MS systems)

    … and so my test project now successfully sends “Windows + L” and locks the computer for me. Why? well I always forget and now I have a big red button on the desk.

    Hope those definitions are correct and useful to someone.

    • Fafhrd

      Oh … should have said:
      * Random Chinese sourced Arduino UNO R3.
      * Using FLIP 3.4.7 on the PC to do the ATMega16U2 programming.
      everything else sourced from material and postings in the tutorial (So all the information you need IS here somewhere)

    • Ixo

      I can’t figure out why
      #define KEY_LEFT_CTRL 0x01 corresponds to left ctrl where documentation points at 0xE0

      Can someone clear this out for me?

      • Ixo

        I think I found the understanding.
        Just read about USB HID REPORT BUFFER
        It turns out that the buffer waits for array containing 8 values.
        [modifier, reserved, Key1, Key2, Key3, Key4, Key6, Key7]

        so buf[0] is a *modifier* not an actual Keyboard Press.

        So to type “a” you need the following array [0,0,4,0,0,0,0,0]
        but to type “A” you need a modifier SHIFT so the array will need to be [2,0,4,0,0,0,0,0]

        See the list of modifiers from that source is below:
        0x01: left control
        0x02: left shift
        0x03: left alt
        0x04: left GUI (Win/Apple/Meta key)
        0x05: right control
        0x06: right shift
        0x07: right alt
        0x08: right GUI

        However this does not fully corresponds to the logic from the arduino-keyboard.hex as e.g. RIGHT ALT + x = ź in my language. When using buf[0]= 0x07 and buf[2] = 27 i get capital Ź.

        I will try to understand this a bit more as I can’t find a valid documentation for this anymore.

        • Ixo

          I run the script to output some HEX values into modifier combinations the list below is not complete as most of the later modifiers are off the head like RCTRL LALT LSHIFT LCTRL LWIN

          SO:

          0x00
          0x01 LCTRL
          0x02 LSHIFT
          0x03 LSHIFT LCTRL
          0x04 LALT
          0x05 LALT LCTRL
          0x06 LALT LSHIFT
          0x07 LALT LSHIFT LCTRL
          0x08 LWIN
          0x09 LWIN LCTRL
          0x0A LWIN LSHIFT
          0x0B LWIN LSHIFT LCTRL
          0x0C LWIN LALT
          0x0D LWIN LALT LCTRL
          0x0E LWIN LALT LSHIFT
          0x0F LWIN LALT LSHIFT LCTRL
          0x10 RCTRL
          0x11 RCTRL LCTRL
          0x12 RCTRL LSHIFT
          0x13 RCTRL LSHIFT LCTRL
          0x14 RCTRL LALT
          0x15 RCTRL LALT LCTRL
          0x16 RCTRL LALT LSHIFT
          0x17 RCTRL LALT LSHIFT LCTRL
          0x18 RCTRL LWIN
          0x19 RCTRL LWIN LCTRL
          0x1a RCTRL LWIN LSHIFT
          0x1b RCTRL LWIN LSHIFT LCTRL
          0x1c RCTRL LWIN LALT
          0x1d RCTRL LWIN LALT LCTRL
          0x20 LSHIFT
          0x40 RALT RCTRL
          0x80 RWIN

          LALT 0x04
          LCTRL 0x01
          LSHIFT 0x20
          LWIN 0x08
          RCTRL 0x10
          RALT 0x40 (i think)
          RWIN 0x80

  • İbrahim

    Hello ı dont know Arduino well but ı try learn ıt.ı want to use arduino on my project. I have Arduino Uno R3 and Arduino Mega 256 ADK. I want to control game wıth push button .ı mean ı want to use push button lıke keyboard lıke these examples. But ı could not run these codes. Must ı change my arduino model or can ı control by these uno r3 and mega 256 adk? can you help me about these subject please? Or can you contact wıth me on thıs e-mail?
    [email protected]

    • marc

      You need to program the Arduino chip with the Arduino-keyboard-0.3.hex file with flip (on windows) otherwise it won’t work.

  • İbrahim

    wıll some body help to me ?

  • Pingback: Choosing an Arduino board | Rodolfo's Blog()

  • Pingback: Choosing an Arduino board (for this project) | Rodolfo's Blog()

  • Pingback: HID | wer bastelt mit?()

  • meshif

    Awesome. Been looking for something like this so I can make physical controls for Flight Sim, Train Sim and Kerbal Space Program. I’m sure I will find other uses for this too

  • Joscha

    Does this use a USb Keyboard standert i can use with my Raspberry pi?
    I want to build this arduino with a few key useing the “MPC Keyboard Daemon” to control the musik (and if it works controll other things so I can use the GPIO for the Display i want to add.

  • Can this all be done with an Arduino Nano? How else can sketches be loaded into the Arduino is this is done?

  • I created a project that fully replaces the Arduino Bootloader. You are able to upload sketches and use it as HID. See Project HID on Github: https://github.com/NicoHood/HID

    • This looks great do you know if this can be made to work with the Arduino Nano

      • No. The Nano has a FTDI Programmer which meens no USB at all. It could work with the DUE and with the Mega ADK. The due is not tested and the mega adk needs to be programmed via icsp because of a 8u2 instead of 16u2 (less flash).

  • Arne

    Hi,
    is it correct, that the Leonardo R3 is able to send Media und Keyboard commands on default?

    • Yes and no. Keyboard by default, Media with modification. But its working better with Arduino Uno/Mega if you ask me. Have a look at this and feel free to email me via my blog. https://github.com/NicoHood/HID

  • Pingback: Flashing your Arduino’s firmware (Part 2)Dan's Landing | Dan's Landing()

  • Don’t know if anyone’s mentioned it, but for Volume+/Volume-/Mute , think the buttons should be moved three spots left – their locations do not actually correspond to bits 5,6 and 7

  • Fun! FYI on the Arduino UNO R3 if you want to put into dfu mode you just short out the top two pins on the USB ICSP header. That puts the unit into DFU mode and you can upload the firmware that way (instead of the soldering hack or the shorting wires hack)

    1. flash the Arduino-usbserial-uno.hex file to make sure the uno driver on a COM port is loaded…then upload your sketch.
    2.put into DFU mode by shorting headers on USB controller ICSP header.
    3. upload firmware via the FLIP program provided by ATMEL
    4. power cycle.

    VIOLA!

  • Pingback: Arduino jako klávesnice a myš | Arduino.cz()

  • Pingback: Flashing your Arduino’s firmware (Part 2) | Laboratorium()

  • Ian

    Is this possible with just the ATmega328 chip with the arduino bootloader? (like this: https://www.sparkfun.com/products/10524)

    • No you need an Arduino Uno/mega with a 16u2 as well.

  • Pingback: Turning an Arduino into a USB keyboard | Hackaday()

  • Pingback: Arduino as USB HID | CL-UAT()

  • Digitol

    The link to the PDF file is dead. You can download a copy of the HID keyboard mappings here: https://github.com/buaabyl/vmulti/blob/master/doc/USB%20HID%20Usage%20Tables%201.1.pdf

    Click on raw data. – Digitol

    • Digitol

      Page 53

  • mtcjayne

    I have a question since I’ve never messed with Arduino’s IDE, microcontrollers, or keyboards. Could I hook the traces coming off the two layers of my consumer grade keyboard (the traces that go to the keyboard’s stock microcontroller) to pins on an Arduino board’s headers and have a “multi-mode” keyboard? I’m thinking of buying a board and some components to make a keyboard that can switch between physical layouts (with multiple labels on the key caps) based on the position of a hardware switch. I don’t want to jump in without advice on whether or not my goals are too high.

  • marc

    What does ”Flash firmware sketch using Arduino IDE” mean? The IDE can’t open .hex files.
    ?
    I’m, then, supposed to assume that there’s a firmware sketch. What firmware sketch? What????

  • Cloureiro

    Hello,

    Can this also be used on arduino Micro with the ATmega32U4?

    Best regards,

  • Jake

    Hi! I was wondering how you found those values for the keys such as buf[2] = 128; // Volume up key or buf[2] = 129; // Volume down key.

  • Hi,
    I’m trying to turn my Arduino Uno rev3 (NO SMD) into a HID Keyboard.

    With the command:
    sudo dfu-programmer at90usb82 erase

    I’m obtain the error:
    dfu-programmer: no device present.

    I need to solder a 10K resistor on my Arduino board?
    Where?

    Arduino UNO rev3 back is different from the Arduino on the photo 🙁

    • – The chip for Arduino Uno rev3 is an atmega16u2
      – dfu-programmer version must be > 0.5

      • In my case It works only with dfu-programmer 0.7.2

  • Nate

    I am having trouble getting the shift key modifier to work. Whenever I attempt to use a shift and print a capital letter nothing appears on the screen. Help is greatly appreciated!

  • Brandon

    How can I use this to press and hold multiple keys like “a+b+c” . So I can play games with this.

  • Pingback: How to press and hold many keys with arduino uno + Keyboard usb firmware? | DL-UAT()

  • Why are you not using pull-downs (internal from arduino or hardware)? To avoid floating button contacts.

  • Pingback: How to use an Arduino Uno + Keyboard Firmware to make a "N Key Rollover" Game Pad | DL-UAT()

  • Mike

    Any luck getting the Serial.Read() to work? Looking to obtain the Numlock and Caps Lock information.

  • temagaiva

    Hello! How about next track and under track?

  • Alan

    Modifiers don’t work for me (buf[0]). I tried exactly the same code for the copy-cut-paste example but only the letter appears (c,x,v). Could it be a version issue?

  • were i found arduino hid interface code ? i need 32 buttons/16 encoder and 8 analog inbut to arduino whit my flight simulator. i know have made but i want make same whit my arduino too but i no can write code. anybody help, links ? code ? leo bodnar make card but have wery expensive 🙁

  • dechecker

    How can I earse the Arduino again. Now my Uno sends random Keys and plays Keyboard. I can’t reset so I can flash it again. 🙁 Connecting the to PINs to reset the 16u2 have no effect. Please help.

    • dechecker

      got it. wrong ping connected for reset -.-

  • I thank you for the arduino keyboard tutorial. I don’t understand how the usb connection really works, but don’t really need to. I have what I hope is a quick question for you. I want to send keystrokes like you have done, but I also want the arduino to receive commands from a packaged software that requires ‘standard firmata’ to be in the code. Do you know if these two things will work together?
    Thanks again,
    Mike

  • Pingback: [ASK] arduino - Possible to create IP-to-USB HID (keyboard) device using Arduino? | Some Piece of Information()

  • Pingback: Journal #5 2017-03-09 – takeshismith()

  • Roy

    Thank you for this post. After few trials, it works perfectly.

  • James Nylen

    Thanks for this article. I got USB keyboard emulation working on my Uno with some minor changes and posted my project on GitHub, with some links to updated documentation and reference materials.

    • mantaj singh

      yaa finally it works hexadasibal code works not desibal.

  • Pingback: Flashing your Arduino's firmware (Part 2) | | Dan's Landing()

  • Ege Feyzıoglu

    The dropbox links are dead. You might want to update them (meanwhile, the hex files can be downloaded from https://github.com/nylen/auto-f1-presser [given nylen doesn’t delete the repo])
    Edit: Grammar

  • 김영성

    great!

  • Pingback: system programming project idea [on hold] – program faq()

  • Pingback: A10 Shortcut Keyboard for Designers – HCDE 451 Process Blog()

  • Pingback: tutorial pdf Keyboard MPK88 Akai – Akai Professional MPK88 Keyboard and USB MIDI Controller()

  • Anna Sarah Krämer Fazendeiro

    This would be perfect for my USB foot pedal to fight my RSI!

  • Anna Sarah Krämer Fazendeiro

    Trying to have the mouse scroll wheel on a foot pedal using this scheme. I used arrow_up and arrow_down for the scroll but it works a lot slower than if I use the keyboard keys. I would be grateful for any ideas how to fix this (or other ideas how to do this).

    • roman

      If it is still of interest:
      I suspect the arrow_up and arrow_down keys may be the arrow keys on the keyboard. mouse wheel scrolling would be something like mouse.wheel…
      have to admit i don’t understand the mouse api yet.

  • Pingback: Keyboard MPK88 Akai website coupons December – Akai Professional MPK88 Keyboard and USB MIDI Controller()

  • Pingback: buy MPK88 Keyboard price new – Akai Professional MPK88 Keyboard and USB MIDI Controller()

  • Pingback: MPK88 Akai cost best buy – Akai Professional MPK88 Keyboard and USB MIDI Controller()

  • Pingback: buy MPK88 Keyboard Akai discount – Akai Professional MPK88 Keyboard and USB MIDI Controller()

  • Pingback: Akai MPK88 warranty by serial number – Akai Professional MPK88 Keyboard and USB MIDI Controller()

  • Maxwell Turpin

    Hi,
    Just letting you know that your firmware files have 404-ed.
    Thanks.

  • Pointy Boye

    does it work with a leonardo?

  • Ben Hutchinson

    You forgot one step where you were talking about the production cycle. You forgot to add one more “plug cycle the arduino” step. You wrote:

    “Flash Arduino-usbserial.hex bootloader with dfu-programmer (erase/flash/reset)
    Plug cycle the Arduino
    Flash firmware sketch using Arduino IDE
    Plug cycle the Arduino
    Flash Arduino-keyboard-0.3.hex bootloader with dfu-programmer (erase/flash/reset)
    Test and repeat”

    It should say:
    “Flash Arduino-usbserial.hex bootloader with dfu-programmer (erase/flash/reset)
    Plug cycle the Arduino
    Flash firmware sketch using Arduino IDE
    Plug cycle the Arduino
    Flash Arduino-keyboard-0.3.hex bootloader with dfu-programmer (erase/flash/reset)
    Plug cycle the Arduino
    Test and repeat”

    You need to plug cycle the Arduino after ANYTHING you upload from the PC, whether it’s a new program, or a new firmware.

  • Ben Hutchinson

    And what about emulating a mouse or joystick? Will the “arduino-keyboard-0.3.hex” firmware allow you to emulate any kind of HID device (depending on how you wrote your program/sketch)? Or is it ONLY for emulating keyboards?

  • mantaj singh

    Hi, I got problem while uno 16u2 ic is in usb serial mode, then there is output throw serial port when button press, after uploading HID farmwear there is no output on notpad but manager show HID device conected. Also the random code is also working with hid.

  • mantaj singh

    yaa finally it works hexadecimal code works not decimal

  • Pingback: Using Arduino as a USB HID / Jonathan Ihlein()

  • Pingback: Arduino Project Tutorial: Macro Keyboard – Miftah Steven Code()

  • Les Nie

    I was tired by the MacOS constantly bugging me about admin password, because of “security” you know… then I came across this post and built for myself an one key keyboard to type my password and then enter key. Since it is a real, physical keyboard it works seamlessly! Thank you for the great tutorial!!!

  • Pingback: Arduino USB HID Keyboard – 不分享空間()

  • Pingback: Arduino USB HID Keyboard – MitchTech – PCA2Z()

  • Pingback: Riding Through Walls: Google Street View Stationary Bike Interface -()

  • Pingback: Arduino 作为 USB HID – Step开发问答()

  • Pingback: Подключение кнопки в качестве USB-входа ПК через Arduino()

  • Pingback: Possible to create IP-to-USB HID (keyboard) device using Arduino? ~ Arduino ~ InsideDarkWeb.com()

  • ayaan sharma

    sir, i want to know, from where u get to know about these key codes. i aso want to know all keycodes!!

  • Pingback: Plug and Play Arcade Buttons -()

  • Pingback: Plug and Play Arcade Buttons – My Blog()