topamax once a day

Android + Arduino + USB Host + Simple Digital Output

Simplest possible digital output with Android and Arduino. This article will discuss the bare minimal requirements for development of an Android USB digital output device. The goal is to demonstrate the easiest possible use of the technology. For additional background information on Android development, Arduino, and MicroBridge, check out these links:

Android Developer’s Guide
Getting Started with Arduino
Microbridge


Getting Started

First, make sure you have setup the development environments for Arduino and Android:

Arduino IDE
Android SDK


Hardware

Parts needed:

  • Android Device (1.6+)
  • 3x LED Lights
  • 3x 330 ohms resistors
  • Breadboard
  • Power supply
  • Hook-up wire
  • Android ADK Board*
  • – OR –
  • Arduino compatible and USB Host shield

*Supported boards include:

Google ADK boardFreeduino ADK board Seeed Studio ADK board, and DIY Drones ADK board


Assembly

Connect the 330 ohm resistors in series with the anodes of the LEDs to the desired digital output pins, and the cathodes of the LEDs to ground. The example uses digital pins 2, 3, and 4, but can be used with any IO pin that doesn’t interfere with the SPI communication with the USB Host Board. For most boards, these are pins 10 – 14. The resistors, in this case, are being used to prevent current overdraw to the LEDs. Here is a diagram of the completed circuit (created with Fritzing):
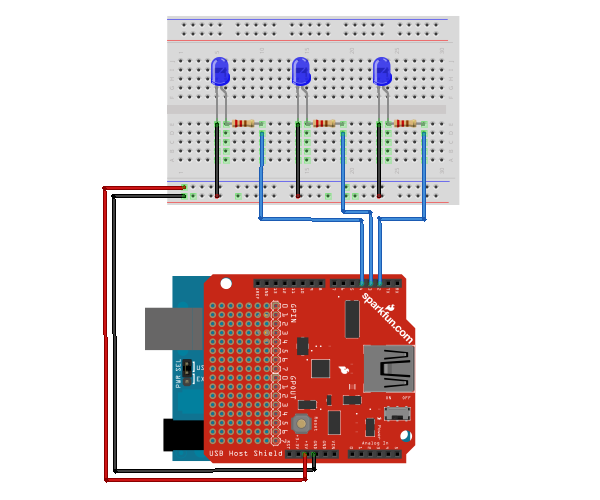
 

Software

Arduino Firmware

Next, upload the Arduino sketch to the microcontroller. The sketch uses the Microbridgeimplementation by Niels Brouwers. Microbridge uses Android Debug Bridge (ABD) forwarding over TCP, rather than the official Google Android ADK. You can checkout the source for the Arduino sketch from Github, or just copy and paste the following into the Arduino IDE.


Android App

Finally, install the Android Demo application onto the device. You can either download the pre-built .apkor checkout the source from Github:

git clone git://github.com/mitchtech/android_adb_simple_digital_output.git

Finally upload the app to the device (or browse to this page on the device and download the apk above). Connect the Android device to the USB Host board/shield, and start up the app.

  • Pingback: Android + Arduino + USB Host + Combination Lock | MitchTech()

  • Pingback: Android + Arduino + USB Host + Pan Tilt LEDs | MitchTech()

  • aditya pratap singh

    great example i have successfully implemented this example. actually i am making android application in which when phone rings then led blink. i have implemented the phonelistener class it is detecting the state of the phone but its not able to send the byte using this code

    try {
    // Send the state of each LED to ADK Main Board as a byte
    mServer.send(new byte[] { (byte) mLedData1});
    } catch (IOException e) {
    Log.e(TAG, “problem sending TCP message”, e);
    }

    i am using the same arduino code that u have used to ledblink using button. can pls help me. i struggling a lot.

  • I think the Arduino code is not the one for this example? Either way, I made the code on my own and used your Android version. Works like a charm!

    Thanks a lot for your guide! 🙂

    • Mahmoud Shahin

      Can you help me ahmed i have some errors in line 18 of the arduino code
      connection = ADB::addConnection(“tcp:4568″, true, adbEventHandler);
      i don’t what is this error ??

      • Hi! Did you use the Arduino code on this page? because I’m fairly sure it does not match this example.

        Anyways, what does the Arduino say about the error?

      • I think I know what the error is! When you copy-paste the code into the Arduino IDE, the ‘ ” ‘ & ‘ – ‘ characters are not copied correctly. So you’ll have to rewrite them.

        The IDE probably tells you that there’s a stray / error, right?

        • Mahmoud Shahin

          What arduino version you use ( 1.0.1 or 1.0 or 0.022)?
          which library you used ? there are a lot of libraries ??
          to know also i am using arduino mega adk …
          the error in line 18
          connection = ADB::addConnection(“tcp:4568″, true, adbEventHandler);
          thanks a lot for your answer ..

          • Mahmoud Shahin

            Ahmed ,
            yes there are a stray error 😀
            what is the solution 😀 ?

        • Mahmoud Shahin

          to be specific
          how can i change ” – ” written in line 23
          if ((millis() – lastTime) > 20)
          ??????????

        • Copying and pasting the code directly from the website seemed to grab extra characters, so I have enclosed it within a github gist. It should now work correctly without stray ‘\’s now!

          That was indeed the issue, thanks for pointing out the easy fix!

    • ahmed can you send me the arduino code for this tutorial? thanks 😀
      email: [email protected]
      \

      • Hi!

        Michael changed code to the one relavant for this example. You can refer to his in case you are using 3 LEDs.

        I’ll send you a simpler version which uses only one LED as a proof of operation 🙂

        • Zach

          Could you send me the code you wrote for arduino with the one LED? My email is [email protected]

  • Pingback: Android + Arduino + USB Host + Serial 4 digit LED | MitchTech()

  • Antonis Kanaris

    Hello.The adb work with usb host shield 2.0 and arduino duemilanove?I try but mine no work.No errors.When put button led application no flash.What libraries i must use the default microbridge?

  • alcibiades

    the code is correct but you need to open de monitor serial in arduino IDE and active the NL&CR so i work myself

  • hanaa

    i have downloaded android application on mobile and uploaded arduino code there were no errors, but nothing happen and on arduino serial menitor that is error appear “Error: OSCOKIRQ failed to assert”what can i do ?
    thanks alot

  • hanaa

    i have downloaded android code on mobile and upload arduino code on mega there were no erros , but nothing happen and when running arduino serial menitor thar error appear “Error: OSCOKIRQ failed to assert”
    what can i do?
    thanks

    • bill hutchison

      I get the same error (“OSCOKIRQ failed to assert”) when I upload and start on both Mega 2560 and Uno R3. It occurs at the line ADB::init();, and there is a long delay (timeout?), then it proceeds, but the app doesn’t work. I tried all the fixes for this error that I found on google, but nothing stopped it. Might that just be that it’s not connected to an Android at that time, so it’s not a problem? I can’t monitor for that error when Arduino is connected to Android.

      On the Android side, I set it to print to a message box on the screen while running, and when it hits send(data), it reports there are 0 clients. In the server code where it should be adding clients, it seems to choke on “socket = serverSocket.accept();”

      Any suggestions how to fix this? Mitch, you have many great examples, but most have this same code, so I’m dying to fix it. Thanks for posting all these examples.

  • AL

    Hi I use Meka2560 ADK i’m download source code burn to board and android device it not error but unusable same VIDEO

  • jean

    hi, I’m new to Arduino.Instead of using the USB shield, i have an Arduino Uno and a bluetooth Wireless TTL Transceiver Module. Is it possible to use the same Arduino sketch and the same apk file to complete this circuit?

  • Joms

    I have tried this with an Arduino Mega 2560 ADK… I have used the inbuilt USB of the board to communicate with the Android device…No errors But No output

  • keng

    I’m using Mega ADK and I received this error “wiring.h: No such file or directory”. Any idea how i can fix this?

  • Deep

    Thanks, it is working for me.

    I used,
    Arduino UNO with Arduino 1.0.5
    Sparkfun USB Host Shield (for this application no need to connect RST to D7)
    Android 2.3.5 (HTC Desire HD) with Android Studio 0.3.2
    (project exported from Eclipse (Gradle export) and imported to Android Studio)
    (I had to change the Geadle version in “your-project/gradle/wrapper/gradle-wrapper.properties” to 1.8)

    according to this post,
    http://mitchtech.net/android-arduino-usb-host-swivel-head-android-with-leds/

    In the following files:
    Adb.h, usb.cpp, and max3421e.cpp
    Change the line:
    #include “wiring.h”
    to
    #include “Arduino.h”

    • This made the application work. Thanks!

      • hi….i am using arduino uno ….all the program is burned in my arduino…without error …but…..i am not getting the output…pls help me

    • babis

      Worked out of the box. Thank you!

  • ArdAnd

    Tried you [rogram and it does not seem to work is there anything I need to set on my phone for example in developer mode?

    thanks

  • Irish Oliveria

    phoneLED.ino:2:17: fatal error: Adb.h: No such file or directory
    compilation terminated.
    Error compiling.

    How to deal with this?

  • Muhammad

    can i use Arduino uno micro controller instead of usb host shield

  • Pingback: Just What Is Usb Host Mode Htc One. – Virtual dedicated server()

  • Pingback: android file host – Android Update()