topamax once a day

Android + Arduino + USB Host + Simple Analog Output

Simplest possible analog output with Android and Arduino. This article will discuss the bare minimal requirements for development of an Android USB digital output device, a controllable RGB LED. The goal is to demonstrate the easiest possible use of the technology. For additional background information on Android development, Arduino, and MicroBridge, check out these links:

Android Developer’s Guide
Getting Started with Arduino
Microbridge


Getting Started

First, make sure you have setup the development environments for Arduino and Android:

Arduino IDE
Android SDK


Hardware

Parts needed:

  • Android Device (1.6+)
  • RGB LED
  • 3x 330 ohms resistors
  • Breadboard
  • Power supply
  • Hook-up wire
  • Android ADK Board*
  • – OR –
  • Arduino compatible and USB Host shield

*Supported boards include:

Google ADK boardFreeduino ADK board Seeed Studio ADK board, and DIY Drones ADK board


Assembly

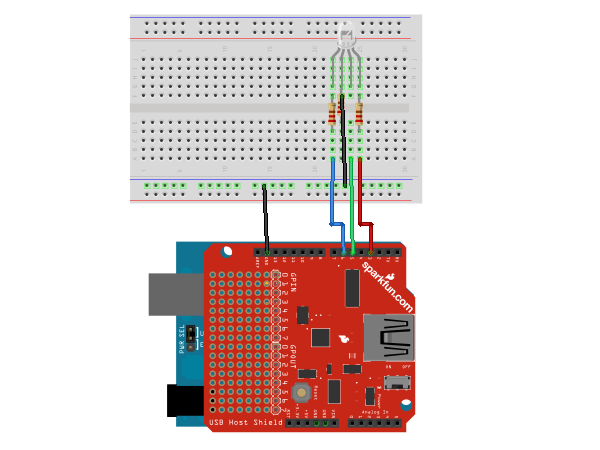
The RGB LED has four leads: the three short ones are anodes that correspond to each of the three colors (red, green, and blue) and the fourth, longer lead is the common cathode.  Connect the 330 ohm resistors in series with the anodes of the LED and the common cathode to ground. The example uses pins 3, 5, and 6, but can be used with any PWM pin (usually denoted with a ~ symbol) that doesn’t interfere with the SPI communication with the USB Host Board (usually pins 10 – 14).  The resistors, in this case, are being used to prevent current overdraw to the LEDs. Here is a diagram of the completed circuit (created with Fritzing):
 

Software

Arduino Firmware

Next, upload the Arduino sketch to the microcontroller. The sketch uses the Microbridgeimplementation by Niels Brouwers. Microbridge uses Android Debug Bridge (ABD) forwarding over TCP, rather than the official Google Android ADK. You can checkout the source for the Arduino sketch from Github, or just copy and paste the following into the Arduino IDE.


Android App

Finally, install the Android Demo application onto the device. You can either download the pre-built .apkor checkout the source from Github:

git clone git://github.com/mitchtech/android_adb_simple_analog_output.git

Finally upload the app to the device (or browse to this page on the device and download the apk above). Connect the Android device to the USB Host board/shield, and start up the app.

  • Pingback: USB Port programmieren - Seite 4 - Android-Hilfe.de()

  • Jackson

    Hello, I copy and pasted the code in the Arduino sketch. By clicking Verify several errors appear:

    error: variable or field ‘adbEventHandler’ declared void
    error: ‘Connection’ was not declared in this scope
    error: ‘connection’ was not declared in this scope
    error: ‘adb_eventType’ was not declared in this scope
    error: expected primary-expression before ‘length’
    error: expected primary-expression before ‘*’ token
    error: ‘data’ was not declared in this scope
    error: expected constructor, destructor, or type conversion before ‘*’ token
    error: variable or field ‘adbEventHandler’ declared void
    error: ‘Connection’ was not declared in this scope
    error: ‘connection’ was not declared in this scope
    error: ‘adb_eventType’ was not declared in this scope
    error: expected primary-expression before ‘length’
    error: expected primary-expression before ‘*’ token
    error: ‘data’ was not declared in this scope

    I’m using version 1.01 of arduino.
    What am I doing wrong?

    • Have you installed the Microbridge library? If not, you will need to download the Adb library here and unpack it into the libraries directory of your Arduino installation as described in the Getting Started guide for Microbridge.

      • Josh

        Hi, I also encountered that problem and I already followed your instruction, but still I had this error: variable or field ‘adbEventHandler’ declared void.

      • Josh

        Greetings Sir! If you don’t mind, I just want to ask if it’s possible, if I use Arduino ATMEGA 328 + my Android Phone + USB Adaptor in doing this project?

  • Pingback: Android + Arduino + USB Host + Temperature + Light | MitchTech()

  • Pingback: Android + Arduino + USB Host + Swivel Head Android with LEDs | MitchTech()

  • Pingback: Android + Arduino + USB Host + D-Pad | MitchTech()

  • Pingback: Android + Arduino + USB Host + Dual Analog Input | MitchTech()

  • Pingback: Android + Arduino + USB Host + Sensor Graph | MitchTech()

  • Lee

    I try to make this project exactly same, But It didn’t work =(

    I checked parameter data[0], data[1], data[2] using Serial.println() function, that value is keep 0. that value does not change!

    so, What should I do? plz help me

  • Hi Firstly Thank you very much for this work. =) but I have a problem. Im new for this subjects(usb input and output) and Could you u help me please where should i start? Could you suggest a basic and simple document abouth this to me and for new students like me =) My english is poor and i cant understand complex sources. so if u prepare a source or documents for this subjects can u share it please? I want to learnt this subject’s beginning parts. Thank you very very much =)

  • Hmmm Actually I get something from ur shares. =) I think u use a usb controll board as input or output connector.. Oke so i want to ask something. I want to do a quadcopter. and this copter have 4 motors and this motors have driver cards u know =) can i control this motors speed with this usb control card? what can I do and which control card is for me? and cheap =) I can buy cheaper because Im a student =) Thank youuu =)