Arduino USB HID Keyboard
Turn your Arduino UNO into a USB HID keyboard, and make buttons that do whatever you want. Make it a useful tool, with new buttons for Cut/Copy/Paste or Volume+/Volume-/Mute, or annoy your friends and colleagues by setting the keyboard to perform random keypress after random delays!
The USB HID keyboard conforms to the standard USB specification, so is functional on all modern operating systems. All this is made possible by the use of the Arduino Device Firmware Update (DFU) function.
Arduino Device Firmware Update (DFU)
The Atmega8U2 chip on the Arduino UNO can be programmed directly using the special USB protocol called Device Firmware Update (DFU). This is completely independant of the ’normal’ method of flashing sketches to the board using the Arduino IDE.
This process is normally used to update the firmware to a more recent version, as explained in the offical Arduino guide, Updating the Atmega8U2 on an Uno or Mega2560 using DFU. Note: If your board is NOT an Arduino UNO SMD you’ll need to solder a 10k resistor (Brown-black-orange) at the back of your board as shown on the Arduino site.
However, in addition to the ability to flash standard USB Serial firmwares, we can also flash alternative firmwares as well. This allows the device to be recognized as many other device types, including keyboard, mouse, joystick, midi device, etc. This is made possible in part to the wonderful open source LUFA (Lightweight USB Framework for AVRs) USB stack, and keyboard HID firmware from Darran.
In this demonstration, we will flash generic USB HID keyboard firmware. The USB HID protocol provides manufactures the generic specifications to interact with nearly every operating system in existence. For more info, check out the USB HID Spec sheet.
Before you start, install the required packages. On Ubuntu and Debain systems, in a terminal run:
sudo apt-get install dfu-programmer dfu-util
For Windows and Mac instructions to install the dfu-programmer tool, consult the official Arduino DFU documentation.
Then download these two firmware files:
[Arduino-usbserial.hex](http://dl.dropbox.com/u/1816557/Arduino-usbserial-uno.hex)
[Arduino-keyboard-0.3.hex](http://dl.dropbox.com/u/1816557/Arduino-keyboard-0.3.hex)
The first step is to make sure you are able to flash the standard arduino firmware. This will confirm that the programmer and the environment are both functional. NOTE: There is no chance of ‘bricking’ the device using this method. The Arduino bootloader firmware can always be updated using the DFU protocol!
sudo dfu-programmer at90usb82 erase
sudo dfu-programmer at90usb82 flash --debug 1 Arduino-usbserial.hex
sudo dfu-programmer at90usb82 reset
Plug cycle the Arduino, then open the Arduino IDE and ensure that you can still upload a sketch. Assuming everything flashes normally, we can move forward with flashing the HID keyboard firmware.
sudo dfu-programmer at90usb82 erase
sudo dfu-programmer at90usb82 flash --debug 1 Arduino-keyboard-0.3.hex
sudo dfu-programmer at90usb82 reset
NOTE: The Arduino can only be flashed with skectches through the Adruino IDE if the Arduino-usbserial.hex bootloader is active. So, to develop a USB HID device, the process becomes:
- Flash Arduino-usbserial.hex bootloader with dfu-programmer (erase/flash/reset)
- Plug cycle the Arduino
- Flash firmware sketch using Arduino IDE
- Plug cycle the Arduino
- Flash Arduino-keyboard-0.3.hex bootloader with dfu-programmer (erase/flash/reset)
- Test and repeat
Now that you understand how the process works, you can try out some of these keyboard samples. The easiest example is the random keypress with random delays, since it doesn’t require any components connected to the Arduino.
Random Key/Random Delay
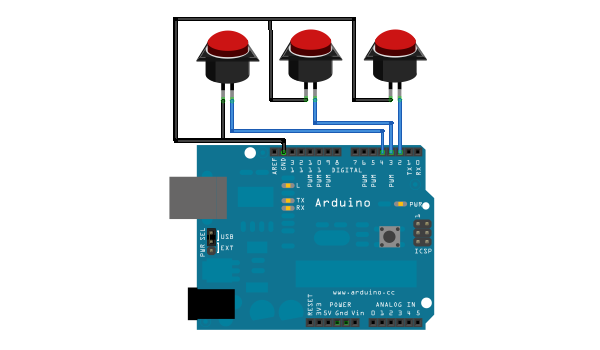
The following two examples both use three buttons connected to the Arduino. The code can easily be changed to make the buttons perform other actions, by consulting the mapping tables in the USB HID documentation. Here is a diagram of the circuit, (created with Fritzing):